Most people assume starting beekeeping costs $500 or more — yet thousands of beekeepers worldwide run thriving hives they built for absolutely nothing. By catching a wild swarm, borrowing equipment from your local beekeeping club, and constructing a hive from reclaimed timber, you can have bees flying and foraging without spending a single penny.
Some of the links in this article may be affiliate links. If you make a purchase through these links, we may earn a small commission at no extra cost to you. Thank you.
Key Takeaways
- Conventional beekeeping startup costs run from $300 to over $1,000 — but every single item on that list has a free alternative
- Wild swarm collection is the most reliable way to get completely free bees each spring
- DIY hives built from reclaimed timber or pallets cost as little as $0
- Local beekeeping associations offer free courses, loaner equipment, and mentors for new members
- Most zero-budget beginners have their first colony active within 3 to 5 months of starting
Is It Really Possible to Start Beekeeping for Free?
The short answer is yes — genuinely, not just theoretically. The longer answer is that “free” in beekeeping means trading money for time, effort, and community connection. Most beekeepers who have started this way will tell you that’s actually the better deal.
A standard beginner setup purchased new typically runs between $300 and $700 — that’s a hive body, frames, foundation, a protective suit, gloves, and a smoker. Add a package of bees, which in 2026 costs anywhere from $120 to $200 or more depending on your location, and you’re looking at close to $1,000 before your first inspection. That’s a real barrier for a lot of people who want to try.
Here’s what experienced beekeepers know: almost every item on that list has a free or near-free alternative. Equipment gets donated and borrowed within local clubs every season. Wild swarms happen naturally every spring and are genuinely free for anyone willing to collect them. Hive boxes can be built from pallets and reclaimed timber. And the knowledge? There’s more free beekeeping education available in 2026 than any one beginner could ever get through.
If you’re planning to keep bees at home, a complete beginner’s guide to backyard beekeeping will complement this article well — it covers siting, local regulations, and first-year colony management in the detail you’ll need alongside the zero-cost approach laid out here.
What Does Beekeeping Normally Cost — and Where Can You Cut It to Zero?
Before looking at the free alternatives, it helps to map out exactly what you’re replacing. Every item in the standard starter kit has a viable zero-budget equivalent — and none of these shortcuts compromise your bees’ welfare or your safety.
| Item | New Cost (2026) | Zero-Budget Alternative |
|---|---|---|
| Hive body (Langstroth) | $150–$300 | Build from pallets or reclaimed timber |
| Frames and foundation | $30–$60 | Borrow from club; build foundationless frames |
| Protective suit | $50–$150 | Borrow from club loaner programme |
| Gloves | $15–$30 | Borrow from club or use thick rubber gloves |
| Smoker | $30–$60 | Borrow from club or mentor |
| Hive tool | $10–$20 | Borrow from club or use a stiff paint scraper |
| Bees (package or nucleus) | $120–$250 | Collect a wild swarm |
| Beginner course | $50–$200 | Free club courses, YouTube, free PDFs |
As the table shows, every single line item has a realistic free equivalent. These aren’t workarounds — they’re simply how resourceful beekeepers have operated for generations.
Step 1 — Learn Everything You Need for Free
Good knowledge is the foundation of good beekeeping — and in 2026, you can build that foundation without spending anything at all. Here are the best free routes into the subject.
YouTube and Online Video
YouTube has become one of the most effective beekeeping classrooms available anywhere. Channels run by working beekeepers cover hive inspections, swarm management, varroa identification, and winter preparation in real-time video. Watching experienced beekeepers narrate live inspections gives you a visual familiarity with healthy brood, a laying queen, and capped honey — the kind of pattern recognition that takes years to build from text alone.
Free PDFs and Digital Guides
Agricultural extension services at major universities publish comprehensive beginner guides as free downloads, covering hive management, pest and disease identification, and seasonal care in practical detail. You’ll also find a wide range of free beekeeping book PDF downloads spanning beginner through intermediate levels — an easy way to build a solid reference library at zero cost.
Local Beekeeping Clubs and Their Courses
Your local beekeeping association is almost certainly your single most valuable free resource. Most clubs run winter beginner courses — many at no charge for new members — with hands-on apiary sessions included. According to the American Beekeeping Federation, local club involvement is one of the strongest predictors of long-term success for new beekeepers. The practical, location-specific knowledge you get from people keeping bees in your exact area is something no textbook can fully replicate.
Step 2 — Find Free Beekeeping Equipment Near You
Equipment is where most beginners feel the biggest pinch — but there are reliable, repeatable ways to get fully kitted out without paying retail prices for anything.
Your Club’s Loaner Programme
Most established beekeeping associations maintain a lending library of protective gear and basic tools specifically for new members. Suits, veils, smokers, and hive tools are typically available at no charge or for a small refundable deposit. Some clubs have complete hive setups in their lending inventory — enough to see you through your entire first season while you source or build your own.
Freecycle, Facebook Marketplace, and Community Groups
Retiring beekeepers regularly give away equipment rather than let it sit in a shed. Search Freecycle, local Facebook groups, and Nextdoor for “beekeeping equipment” and set up alerts so you’re notified the moment something is listed. Full hive setups, suits, and smokers appear on these platforms every season. A single alert set up today could land you an entire kit within a week.
Improvising With What You Already Own
For your very first swarm collection, improvised protective clothing works well enough. Light-coloured, tightly woven fabric tucked at the cuffs and ankles, a pair of thick rubber gloves, and a fine-mesh veil (available for a few dollars at any garden centre) provides genuine protection. It’s not a long-term solution, but it covers you while you arrange proper gear through your club.
Step 3 — Build Your Own Beehive at Zero Cost
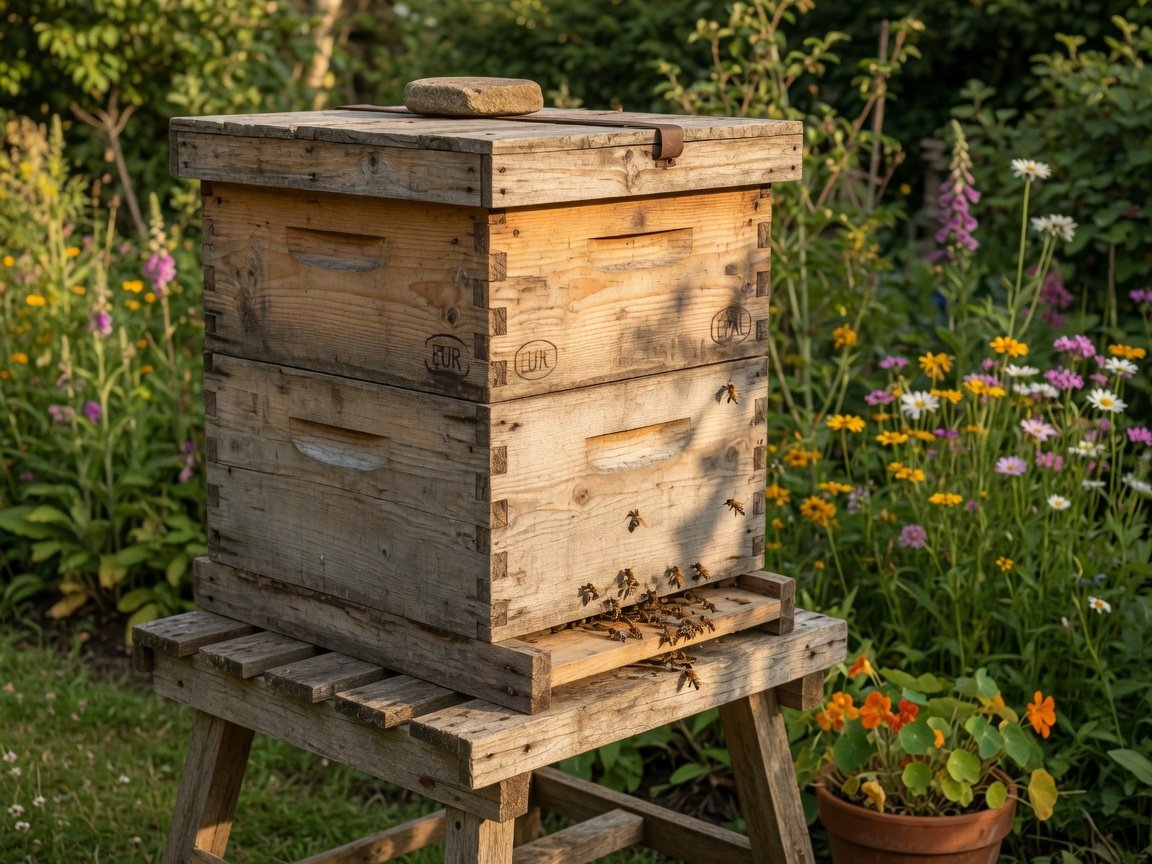
A beehive is, at its core, a precisely measured wooden box. If you can use a saw, a drill, and a hammer, you can build one from materials you find for free — and your bees won’t know or care whether it came from a supplier or a salvaged pallet.
Where to Find Free Timber
Wooden pallets are the most widely used free timber source for DIY hives. Construction site off-cuts, old fence boards, reclaimed shelving, and salvaged decking boards all work well. The key requirement is untreated, non-aromatic timber — avoid anything pressure-treated with preservatives or painted with solvent-based products, as both can harm bees.
Free Hive Plans Online
Detailed cutting plans for Langstroth, Warré, and top-bar hives are freely available through beekeeping societies and hobbyist woodworking sites. The critical measurement to get right is the Langstroth “bee space” — 6 to 9 millimetres — which ensures bees can move freely between components without filling every gap with propolis. Nail that measurement and the rest is straightforward joinery.
For a complete, step-by-step walkthrough including materials lists, cutting guides, and assembly tips, the guide on making your own beekeeping hive box covers the full build process from timber selection through to the finished product.
Foundationless Frames — Zero Cost and Possibly Better for Your Bees
Standard frames use wax or plastic foundation to guide bees when drawing comb. Foundationless frames replace that with a thin wooden starter strip — which you cut from scrap wood — and let bees build natural comb from scratch. Research from bee science institutions suggests that bees on foundationless frames may build smaller, more natural cell sizes that could benefit overall colony health. Either way, it costs you nothing to make.
Step 4 — How to Get Free Bees
This is the question that stops most beginners in their tracks — and the reality is genuinely exciting. Free bees are available every spring, and in many areas homeowners actively want someone to come and collect them.
Collecting Wild Swarms
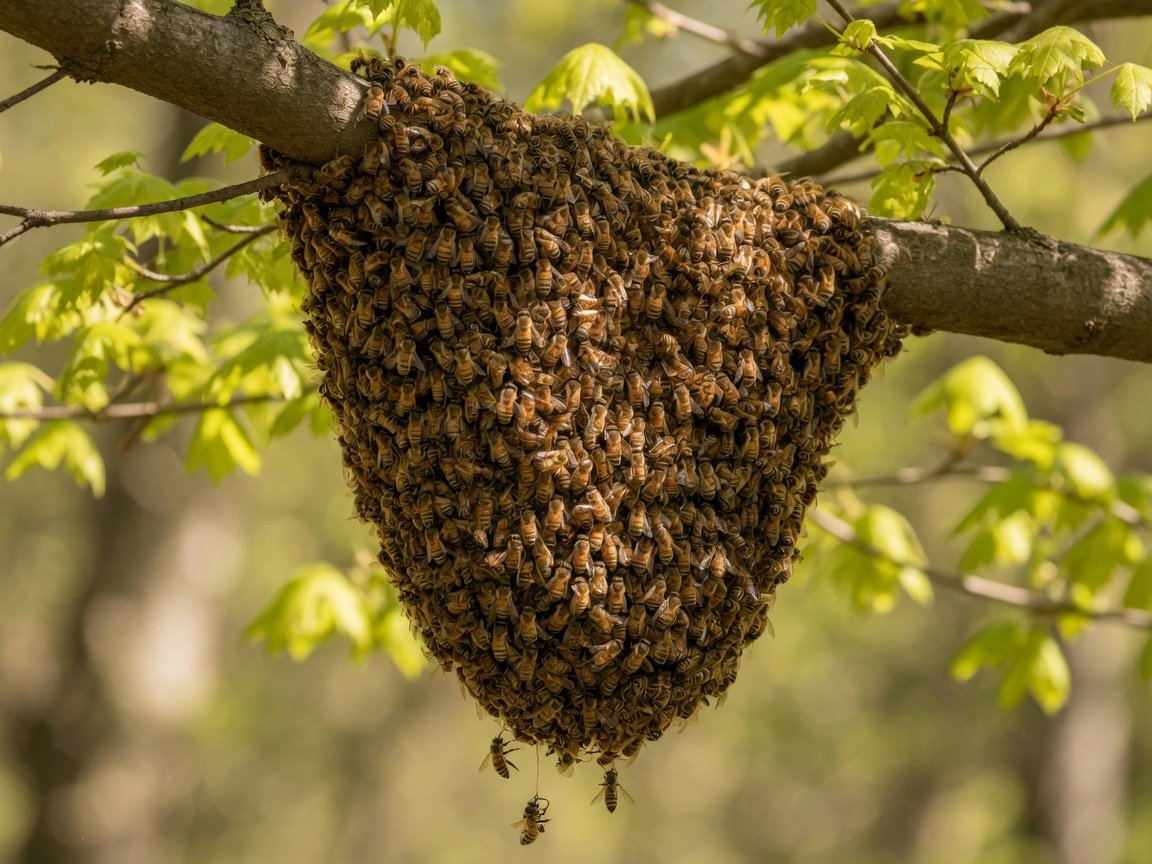
A swarm is a natural event in which a colony divides — roughly half the bees, led by the old queen, leave to find a new home. During swarm season (April through July in most of the Northern Hemisphere), these clusters of 10,000 to 20,000 bees settle on branches, fence posts, and garden furniture while scout bees search for a permanent cavity.
This is your opening. Register with your local council’s swarm collection service, join your club’s swarm response network, and let neighbours and local Facebook groups know you’ll come to any swarms that appear. For a full breakdown of all the ways to acquire bees without buying them — from swarms to rehomed feral colonies — the guide on how to get bees for beekeeping covers every option in detail.
Asking Your Mentor for a Spring Split
Once you have a mentor (more on that shortly), ask if they’d consider splitting a strong colony in spring. A split divides a large, healthy colony into two — your mentor keeps one half and you start your hive with the other, along with either a mated queen or the resources to raise one. Many mentors are genuinely happy to do this, since it also reduces the original colony’s swarm impulse. It’s a win for both of you.
Rehoming Established Feral Colonies
Occasionally, homeowners discover established colonies living in wall cavities, old outbuildings, or hollow trees and want them gone. Advertising in local community groups that you offer free removal brings calls year-round. With proper equipment and mentor guidance, relocating a feral colony into your hive is achievable in your second season — and the homeowner is always grateful.
Step 5 — Find a Free Beekeeping Mentor
A good mentor is worth more than any piece of equipment. Having an experienced beekeeper alongside you during your first inspections — someone who can spot a laying queen, flag early disease signs, and talk you through your first swarm response — will prevent the mistakes that cause most beginners to give up in year one.
Your local beekeeping association is the best place to find one. Most clubs run formal mentorship programmes that pair newcomers with experienced beekeepers at no cost to either party. In the UK, the British Beekeepers Association (BBKA) coordinates mentorship through its regional branches. In North America, state and provincial associations run similar matching services.
Professor Tom Seeley of Cornell University — one of the world’s most respected honeybee researchers and the author of several landmark works on honeybee biology — has long emphasised that bees reveal their true nature through patient, direct observation rather than theory alone. That’s exactly what a good mentor gives you: real hive time, with someone experienced enough to explain what you’re looking at in the moment.
Don’t be shy about asking. Most beekeepers became beekeepers because someone generous gave them their start. Paying that forward is a deeply ingrained part of the culture, and the community is one of the friendliest you’ll find anywhere.
Step 6 — Sorting Out Your Beekeeping Licence
Depending on where you live, you may need to register your hives or obtain a local permit before keeping bees. The good news is that in the vast majority of jurisdictions, this costs little to nothing.
In many US states, hive registration is either free or costs under $10 per year. In the UK, there’s no statutory licence for hobby beekeepers — though registering with BeeBase, the National Bee Unit’s free hive tracking database, is strongly recommended since it connects you to disease outbreak alerts in your local area. In Australia, most states require registration and the fee is typically under AUD $20.
For a detailed breakdown of what’s required in your specific region — including local council rules, insurance considerations, and neighbour notification best practice — the guide on how to get a beekeeping licence covers requirements across different jurisdictions so you know exactly what applies to your situation.
What Ongoing Costs Should You Actually Budget For?
Being honest here matters. While you can start for free, ongoing beekeeping does involve some costs that are genuinely difficult to avoid entirely. Knowing about them upfront lets you plan properly.
Varroa Treatment
Varroa destructor mites are the single biggest health threat to managed honeybee colonies worldwide. Untreated colonies typically collapse within two to three years as mite populations overwhelm the bees. Oxalic acid — the most widely recommended organic treatment — costs roughly $10 to $20 per hive per treatment cycle and is the one line item that’s genuinely hard to eliminate. Many clubs bulk-purchase treatments for members at a significant discount.
Autumn Feed
If your colony hasn’t stored enough honey to survive winter — which is common in year one when they’re building from scratch — you’ll need to supplement with sugar syrup or fondant. The sugar itself costs under $5 per hive for a typical top-up. It’s a small outlay, but worth including in your planning from the start.
Replacing Worn-Out Equipment
Old frames, cracked woodware, and degraded wax foundation will need replacing as the years go on. If you built your original hive from reclaimed timber, you can simply build new boxes and frames to the same plans as needed. Freecycle and the secondhand gear stream from retiring beekeepers will cover most of your remaining replacement needs for the foreseeable future.
How Long Does Zero-Budget Beekeeping Take to Get Off the Ground?
Here’s a realistic timeline for a beginner starting in late winter — the ideal time to prepare ahead of spring swarm season.
- Month 1 (January/February): Join your local beekeeping association. Attend your first meeting, ask about the loaner programme and beginner course, and start watching video tutorials and reading free PDFs in your spare time.
- Month 2 (February/March): Start sourcing reclaimed timber for your hive build. Download free Langstroth plans and begin construction. Make contact with your mentor.
- Month 3 (March/April): Complete your hive build. Register with your local swarm collection network, council alert systems, and community Facebook groups. Alert your neighbours too.
- Month 4 (April/May): Collect your first swarm and install it in your completed hive. Carry out your first inspections with your mentor present — this is where everything comes together.
- Months 5–12: Manage through summer, treat for varroa in late summer, and prepare the colony for winter. Harvest surplus honey if stores are strong — a first-year colony in decent forage territory can yield 20 to 40 pounds.
Across beekeeping forums and club reports, zero-budget starters who follow this path consistently describe their total first-year cash outlay at $0 to $30 — usually limited to varroa treatment and autumn feed once the swarm is caught and the DIY hive is built. The main variable is simply when your first swarm arrives.
From Free Hobby to Real Income: What Comes Next?
Once you’re established, beekeeping has genuine income potential that’s easy to underestimate. A healthy colony in a good forage area yields 20 to 60 pounds of surplus honey per year depending on conditions and colony strength. At current retail prices of $8 to $15 per pound for quality raw honey, that’s a potential return of $160 to $900 per hive annually — from a setup that cost you nothing to start.
Beyond honey, there’s beeswax for candles and cosmetics, nucleus colony sales to other beginners at $150 to $250 each, pollination services for local growers, and educational sessions for schools and community groups. If you’re already thinking about where this hobby could take you financially, the comprehensive guide on proven revenue streams from beekeeping covers 10 different ways experienced beekeepers generate meaningful income from their hives.
Frequently Asked Questions
Can you really start beekeeping with no money at all?
Yes, genuinely. By joining a local club that offers free first-year membership or free beginner courses, using their loaner equipment programme, building a hive from reclaimed timber, and collecting a wild swarm, the total cash outlay can be zero. The investment is your time, effort, and willingness to engage with your local beekeeping community — rather than money.
Is it safe to keep bees without a proper protective suit?
In the early stages, improvised protective clothing — light-coloured, tightly woven layers tucked at the wrists and ankles, thick rubber gloves, and a mesh veil — provides real protection for gentle inspections. It’s not a permanent solution, and sourcing a proper suit through your club’s loaner programme before your hive arrives is strongly recommended. But for an initial swarm collection, improvised gear does the job.
When is the best time to collect a free swarm?
Swarm season peaks from April through June in most of the Northern Hemisphere. A swarm collected in April or May gives your colony the longest possible season to build winter stores. Swarms in July and August can still be hived successfully but need close monitoring in autumn to ensure adequate reserves. Prepare your hive and register on swarm networks before the end of March to be ready when it starts.
Do I need experience to collect a swarm?
Swarms are among the gentlest encounters you’ll ever have with bees. A swarm cluster has no hive to defend, and bees load up on honey before leaving their original colony, making them unusually calm and manageable. That said, having your mentor or an experienced club member present for your first collection is strongly recommended — you’ll learn far more with someone experienced at your side, and you’ll feel much more confident too.
What is the hardest part of starting beekeeping for free?
Patience is the main challenge. You can’t control when a swarm arrives, and in some seasons or locations they’re less frequent than others. Getting your hive built early and registering on every swarm collection network you can find significantly improves your chances. Some zero-budget beginners also find it takes a few weeks to locate the right club or mentor — but persistence pays off. The beekeeping community is one of the most welcoming and generous you’ll encounter anywhere.
Are there free beekeeping books I can read to prepare?
Absolutely. Public libraries carry excellent beginner titles covering honeybee biology and hive management. Agricultural extension services at universities publish comprehensive downloadable guides at no charge. Many beekeeping associations provide printed beginner guides to new members for free, and online forums offer years of searchable accumulated knowledge. Between club resources, library books, and free digital downloads, there’s more quality material available without spending a penny than any beginner could realistically get through in a season.
You’re Ready — Here’s Your Zero-Budget Action Plan
Starting beekeeping for free isn’t a compromise or a workaround — it’s how generations of beekeepers began, and it produces just as capable and knowledgeable a beekeeper as spending $1,000 on day one. What it requires is resourcefulness, patience, and a genuine willingness to lean into your local beekeeping community. The bees, the hive, and the knowledge are all out there waiting for you.
Do These Six Things This Week
- Find your nearest beekeeping association. Search “[your county or state] beekeeping association,” find out when their next meeting is, and go.
- Ask about the loaner programme and beginner course. Most clubs are genuinely excited to welcome new faces and will walk you through everything available to you.
- Start sourcing reclaimed timber. Post on Freecycle and local Facebook groups asking for unwanted pallets or timber. Check building sites and neighbours clearing sheds.
- Download free Langstroth hive plans. Get them printed and ready so you can start building the moment you have the wood in hand.
- Register as a swarm collector. Contact your local council and ask to be added to their swarm response list. Join your club’s swarm network at the same time. The more lists you’re on, the sooner the calls come.
- Commit to 30 minutes of learning a day. YouTube, free PDFs, club meetings — start building the knowledge base now so you’re ready and confident when the bees arrive.
Beekeeping gives back far more than you put into it — in honey, in knowledge, in connection to the seasons and the landscape around you, and in a quiet satisfaction that’s genuinely hard to find anywhere else. The fact that you can begin with nothing but enthusiasm and a willingness to learn makes it even better. Get going.