You can build a solid, functional beekeeping box in a single weekend for around $30–$50 in lumber — that’s less than half the price of most commercial hives. All it takes is a few basic woodworking tools, accurate measurements, and a bit of patience.
Some of the links in this article may be affiliate links. If you make a purchase through these links, we may earn a small commission at no extra cost to you. Thank you.
Whether you’re brand new to bees or expanding your apiary on a budget, making your own beekeeping box is one of the most satisfying projects you can take on. You get to choose the timber, control the quality, and end up with a hive built exactly the way you want it. If you’re still weighing up the whole setup — hive, equipment, location — it’s worth understanding what setting up a backyard hive actually involves before you start cutting wood.
This guide walks you through the entire build: choosing your box style, sourcing the right timber, cutting and assembling the panels, weatherproofing, and the mistakes that trip most first-timers up. Let’s get into it.
Key Takeaways
- A DIY beekeeping box costs $33–$56 in materials — roughly 40–60% less than a comparable commercial box.
- The Langstroth hive is the most beginner-friendly design to build, with standardised global measurements and universal frame compatibility.
- Pine and cedar are the best timber choices; cedar outlasts pine significantly outdoors without chemical treatment.
- Most first-time builders finish a single hive body in 4–6 hours of active working time.
Why Should You Build Your Own Beekeeping Box?
The honest answer is cost, customisation, and the satisfaction of building something yourself. Surveys of hobbyist beekeepers consistently rank equipment expense as one of the top three barriers to starting, and a DIY approach cuts that barrier significantly. A basic commercial Langstroth deep hive body runs $80–$120 before frames or foundation. Build the same box yourself from a single 8-foot pine board and you’re looking at $33–$56 total — roughly half the price.
Scale that across a full hive setup — bottom board, two brood boxes, a honey super, and a roof — and the savings easily hit $150–$200 per hive. For someone starting with two or three hives, that’s serious money back in your pocket.
Beyond cost, there’s a practical case for building your own. When you understand every joint and measurement, inspections, repairs, and expansions become far easier. Veteran beekeepers with decades of experience often note that knowing your equipment inside out makes you a more observant and effective beekeeper overall — there’s no mystery about why a frame is sitting oddly or why the bees are propolis-ing a certain corner.
There’s also the customisation angle. Commercial boxes are built to sell at scale, not to suit your specific climate, management style, or timber preference. A DIY box can be thicker-walled for colder winters, built from locally sourced hardwood, or sized fractionally differently to suit a particular colony’s needs. That kind of flexibility simply isn’t available off the shelf.
What Type of Beekeeping Box Should You Build?
Before you pick up a saw, decide which hive design you’re building. The three most common options for DIY builds are Langstroth, Warré, and top-bar — and each has a different profile in terms of difficulty, flexibility, and equipment compatibility.
Langstroth Hive
This is the gold standard for first-time builders. Langstroth hives account for over 80% of managed honeybee colonies worldwide, which means standardised measurements, an enormous community of builders who’ve documented the process thoroughly, and universal compatibility with frames, supers, queen excluders, and virtually everything else you’ll ever buy. Build a Langstroth box to spec and every piece of equipment you ever add will fit correctly.
Warré Hive
The Warré is a simpler, more natural design. Boxes are smaller and stack vertically, and because bees build naturally from top bars (rather than hanging removable frames), there’s no rabbet joint to cut. It requires slightly less precision than Langstroth and suits a low-intervention management style well. The trade-off is that Warré equipment isn’t standardised across manufacturers, so your sourcing options are more limited.
Top-Bar Hive
The top-bar hive is a horizontal design — essentially a long trough with wooden bars across the top from which bees hang their comb. It’s arguably the easiest hive to build: no complex joints, no heavy lifting during inspections, and a very forgiving construction process. It’s a particularly popular choice for beekeepers with mobility considerations. The main limitation is that it’s completely incompatible with standard commercial equipment.
For this guide, the focus is on the Langstroth deep hive body since it’s the most versatile and useful starting point for most beekeepers. If you want a detailed side-by-side comparison of designs before committing, this guide to choosing the best beekeeping box for your setup covers every style in depth.
| Hive Type | DIY Difficulty | Approx. Build Time | Equipment Compatibility | Best For |
|---|---|---|---|---|
| Langstroth | Moderate | 4–6 hours | Universal | Most beekeepers |
| Warré | Easy–Moderate | 3–5 hours | Limited | Natural / low-intervention style |
| Top-Bar | Easy | 2–4 hours | Not compatible | Mobility-friendly / natural comb |
What Materials Do You Need to Make a Beekeeping Box?
The materials list is refreshingly short. You don’t need specialist timber or exotic hardware — just good quality wood, the right fasteners, and a decent exterior finish.
Timber
For a standard Langstroth deep hive body, you need approximately 8 linear feet of 3/4-inch × 12-inch board. Your two main options are:
- Pine: The most affordable and widely available choice, typically $15–$25 for what you need. Pine is easy to cut, takes paint well, and is perfectly functional — but it needs regular treatment to hold up outdoors. Untreated pine in a humid climate can begin to soften and rot within 3–5 years.
- Cedar: The premium choice. Western red cedar is naturally rot-resistant, lightweight, and has a pleasant aroma that bees tolerate well. It costs 30–50% more than pine at point of purchase, but well-maintained cedar hives routinely last 15–20 years outdoors — a significantly better return on the material cost over time.
Avoid pressure-treated or chemically treated timber entirely — the preservatives used are harmful to bees. Equally, skip MDF, OSB, plywood, or particleboard. None of them hold up against outdoor moisture over time, and most use adhesives that off-gas compounds you don’t want anywhere near a colony.
Fasteners
Use galvanised nails or, better yet, galvanised screws. Standard steel fasteners rust and weaken the joints within a few seasons — galvanised hardware lasts as long as the wood itself. Screws give a stronger, tighter joint than nails and make disassembly easier if you ever need to repair a side panel. 1-5/8 inch coarse-thread decking screws work perfectly for 3/4-inch timber.
Adhesive
Waterproof wood glue — often labelled as Type II or Type III exterior glue — applied to every joint before fastening makes a significant difference to the long-term integrity of the box. Glue alone won’t hold the panels together, but combined with screws it creates joints that resist racking and warping through years of seasonal temperature swings. It’s a $5–$8 investment that’s absolutely worth making.
Exterior Finish
For the outside of the box, choose either exterior-grade latex paint or raw linseed oil. White or a light colour reflects summer heat and keeps the interior cooler — this is why the vast majority of beehives worldwide are painted white or cream. Linseed oil is a more natural option that soaks into the grain rather than forming a surface film, but needs reapplication every one to two years. The interior of the box must be left completely raw — bees apply their own protective coat of propolis, and any paint or chemical treatment inside the box can disrupt or harm the colony.
What Tools Do You Need to Get Started?
You don’t need a professional workshop to build a good beehive box. Most of the tools are things a home DIYer will already have or can borrow for a weekend — and nothing here requires specialist skills beyond measuring carefully and cutting straight.
- Tape measure: Accuracy here is everything. Bee space — the gap bees need to move freely through the hive — is 6–9mm, and frames hang on rabbets that need to be cut precisely. A few millimetres out can cause real problems later.
- Circular saw or table saw: A circular saw with a straight-edge clamped as a guide makes clean, repeatable cuts. A table saw is faster and more accurate if you have access to one.
- Router (recommended) or chisel and mallet: The easiest way to cut the rabbet joint at the top of the box. A sharp 1-inch chisel and mallet work fine if you don’t have a router — it just takes a little more care.
- Drill and driver: For driving screws and, critically, for drilling pilot holes before fastening to prevent the timber splitting at the edges.
- Carpenter’s square: To check corners are at exactly 90° before the glue sets. A box even slightly out of square causes frames to bind on one side and leave a gap on the other — and bees will fill that gap in ways that make inspections very frustrating.
- Corner clamps or a ratchet strap: Four corner clamps hold the box in position during assembly and make checking for square easy. A ratchet strap looped around the whole box does the same job if you don’t have dedicated clamps.
- Sandpaper (80 and 120 grit): 80 grit removes rough saw marks and sharp edges; 120 grit smooths surfaces before painting and improves paint adhesion.
How Do You Cut the Wood? (Measurements for a Langstroth Deep Box)
This is where precision earns its keep. The standard Langstroth deep hive body dimensions have been refined over more than 150 years of practical use — get these measurements right and everything fits. Get them wrong and you’re fighting the hive every inspection season.
The Four Panels
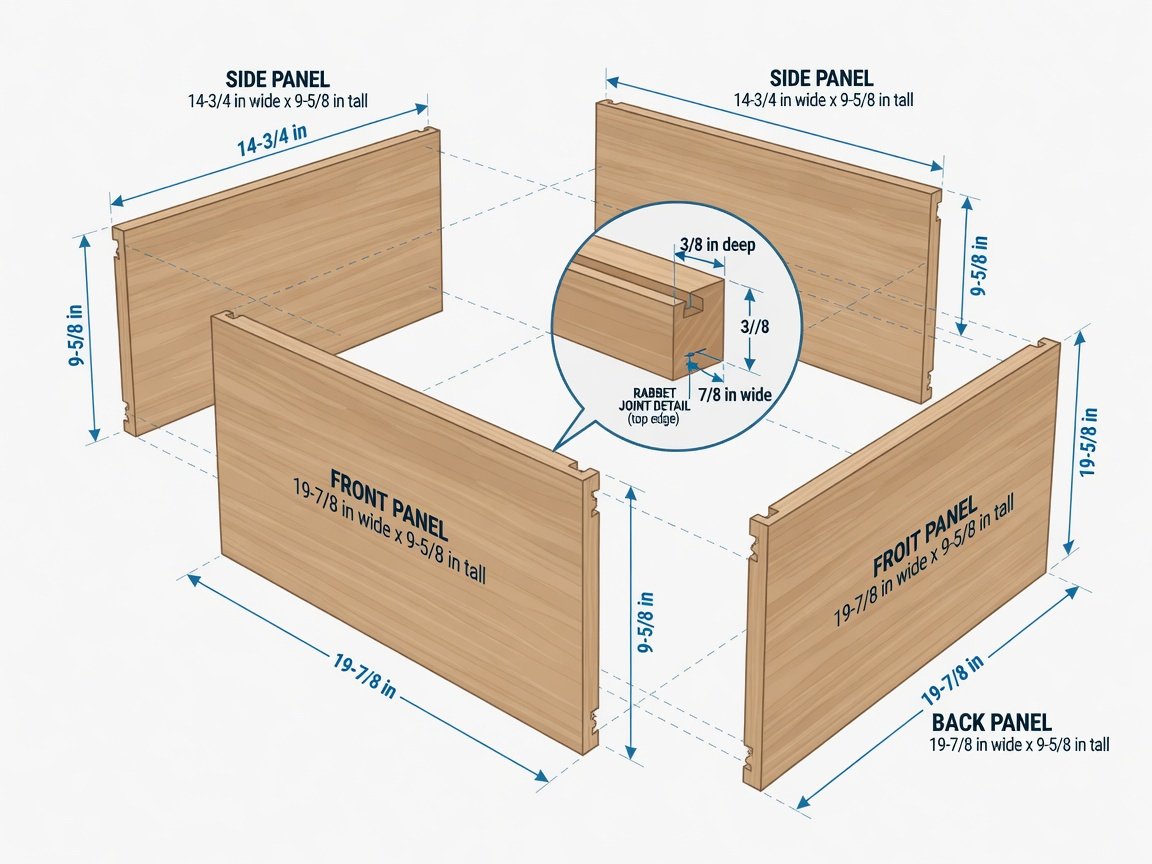
All panels are cut from 3/4-inch (19mm) solid timber. The interior dimensions of a standard Langstroth deep body are 18-5/8 inches long × 14-3/4 inches wide × 9-5/8 inches tall. Here are your four panel cuts:
- Front and back panels (cut 2): 19-7/8 inches wide × 9-5/8 inches tall. These are the full-width panels that span the front and back of the box.
- Side panels (cut 2): 14-3/4 inches wide × 9-5/8 inches tall. These fit between the front and back panels.
The Rabbet Joint (Frame Rest)
The rabbet is a stepped notch cut along the top inner edge of both front and back panels. This is what your frames hang from — it’s arguably the most important cut in the whole build. Standard rabbet dimensions are 3/8 inch deep × 7/8 inch wide. Cut this notch running the full interior length of each front and back panel.
With a router: fit a straight-cut bit, set depth to 3/8 inch, and run it along the top inner edge using a fence guide. Clean and fast. With a table saw: make two passes — one vertical cut at 3/8 inch depth to define the shoulder, one horizontal cut at 7/8 inch width to define the floor, then pop out the waste piece. A sharp chisel cleans up any remaining material in the corner. Either method produces a perfectly functional frame rest.
Cutting Tips That Save Timber and Time
- Measure twice, cut once — an extra 30 seconds checking your line saves a ruined board.
- Mark cut lines with a sharp pencil and a square, not freehand. A wandering pencil line becomes a wandering cut.
- Cut all pieces of the same dimension together using a stop block clamped to your fence — it guarantees consistency across matching panels.
- Sand the cut faces lightly with 80 grit before assembly. Rough saw marks reduce glue contact area and make fitting panels together harder.
- Label each panel (F, B, L, R) in pencil on the face that’ll be internal — it stops you assembling them the wrong way around in the middle of a glue-up.
How Do You Assemble Your Beekeeping Box?
Assembly is the most satisfying part of the build — it’s when a pile of boards becomes a real beehive. Work on a flat, level surface and have everything ready before you open the glue bottle. Once the glue is on, you have a limited working window to get it right.
- Dry fit first. Bring all four panels together without any glue to check they meet cleanly at every corner and the rabbet joints align correctly. This is the time to trim and adjust — not after the glue is set and the screws are in.
- Apply wood glue to all mating surfaces. Run a thin, even bead of waterproof wood glue along every joint surface that will contact another panel. Don’t over-apply — excess glue squeezes out of the joint and needs to be wiped away before it cures.
- Bring the box together and clamp. Assemble the four panels and apply your corner clamps. If you’re using a ratchet strap, wrap it around the box and cinch it until all four corners are tight. Don’t overtighten — you want firm pressure, not crushed timber.
- Check for square immediately. Measure diagonally corner to corner across the top of the box in both directions. Both diagonal measurements must be equal. If one is longer, the box is racked — apply gentle hand pressure to the longer diagonal until both measurements match. Do this before the glue has had more than a few minutes to begin setting.
- Pre-drill pilot holes and drive screws. With the box still clamped, drill 3mm pilot holes through the outer panel face and into the edge of the adjacent panel — two to three holes per corner, evenly spaced. Then drive your galvanised screws home. Pilot holes prevent the timber from splitting along the grain near the edges.
- Wipe excess glue before it cures. Use a slightly damp cloth to remove any squeeze-out from inside and outside the joints while it’s still wet. Dried glue shows through paint and doesn’t accept finish cleanly.
- Allow adequate cure time. Leave the box clamped for at least two hours to achieve working strength, and ideally 24 hours before you put any significant stress on the joints. The glue continues to cure and strengthen for 24–48 hours after application.
How Should You Finish and Weatherproof Your Box?
A properly finished box protects your timber investment and keeps your colony comfortable through heat, cold, rain, and frost. This step takes less than an hour of active work — the waiting is just drying time — and it dramatically extends the life of your hive.
Preparing the Surface
Sand the entire exterior surface with 120-grit sandpaper before applying any finish. Pay particular attention to the top edges and corners — any roughness or splinters here collect moisture and become starting points for rot. Wipe off all dust with a dry cloth before painting.
Painting
Apply one coat of exterior primer first, then two full coats of exterior latex paint. Allow each coat to dry completely before applying the next — rushing this is the number one reason for a finish that peels within a year. White and light colours are the traditional and practical choice: they reflect summer heat and keep the interior up to 5–8°C cooler on hot days, which reduces the energy bees spend fanning the hive to regulate temperature.
Linseed Oil
If you prefer a more natural look, raw linseed oil is a solid alternative. Warm the oil slightly before application — a warm oil penetrates deeper into the wood grain than cold oil applied at the same thickness. Apply generously with a brush, allow 20–30 minutes for absorption, then wipe off the excess. One coat of warm oil typically outperforms two coats of cold oil in terms of penetration depth and long-term protection. Reapply annually or every two years as the finish weathers.
What Not to Do
- Never paint or treat the interior — bees coat it with propolis themselves, and foreign chemicals disrupt or harm the colony.
- Avoid creosote, wood preservatives, or solvent-based finishes near the entrance or on internal surfaces — fumes linger and affect bee behaviour.
- Don’t skip primer on pine. Unprimed pine soaks up paint unevenly and the topcoats won’t bond well, leading to early peeling.
- Don’t put bees into a freshly painted box. Allow at least one to two weeks of airing outdoors before the colony moves in — this off-gases residual paint solvents that would otherwise irritate the bees.
What Common Mistakes Should You Avoid?
Most DIY hive problems trace back to a handful of predictable errors. Knowing what they are in advance saves you the frustration of discovering them mid-season when a full box of bees is involved.
Using timber that’s too thin. Anything thinner than 3/4 inch reduces both insulation and structural rigidity. The box will flex under the weight of a full honey crop and the joints will stress earlier than they should.
Incorrect rabbet dimensions. This is the most consequential measurement error in the build. Frames that don’t seat correctly in the rabbet either fall into the box or sit too high. Either way, bees glue everything solid with propolis at the wrong level, and every inspection becomes a struggle. Double-check the 3/8 inch × 7/8 inch rabbet dimensions before cutting.
Skipping the square check. A box even 1/8 inch out of square causes frames to bind on one side and leave a gap on the other. Bees fill irregular gaps with burr comb and propolis, and the resulting mess is genuinely difficult to manage cleanly during inspections. Checking for square takes 30 seconds — do it every time.
Treating the interior. Worth repeating: paint, oil, stain, or any preservative applied inside the box is harmful to your colony. Leave it completely raw.
Using standard steel fasteners. Regular steel nails and screws rust within one or two seasons outdoors. The rust swells the metal, weakens the joint, and stains the timber. Galvanised fasteners cost fractionally more and last as long as the wood itself — there’s no good reason not to use them.
Not letting paint cure before adding bees. Fresh paint releases solvents for days after it appears dry to the touch. Put bees into a freshly painted box and you’ll see agitated, confused behaviour as they try to deal with fumes in an enclosed space. Air the finished box outdoors for one to two weeks first.
How Long Does It Take — and What Does It Cost?
Let’s put real numbers on this. Across beekeeping communities, first-time builders consistently report 4–6 hours of active working time for a single Langstroth deep hive body — measuring, cutting, assembling, and sanding. That doesn’t include paint drying time, but it means a realistic weekend project: cutting and assembly on Saturday, finishing on Sunday.
Here’s an honest cost breakdown using pine from a local timber merchant:
| Item | Approximate Cost |
|---|---|
| Pine lumber (8 linear ft, 12″ wide, 3/4″) | $15–$25 |
| Galvanised screws (box of 100) | $5–$8 |
| Waterproof wood glue | $5–$8 |
| Exterior paint or linseed oil | $8–$15 |
| Total | $33–$56 |
Compare that to the $80–$120 a commercial deep hive body typically costs, and you’re saving 30–55% per box. Build a full two-box hive setup with a super and you could keep $150 or more in your pocket — money that goes much further on bees, protective gear, or additional hives. Speaking of which, once you’re up and running, there are more ways to earn income from your apiary than most beginners realise — from honey sales to pollination contracts and beyond.
Is a DIY Beekeeping Box Better Than a Pre-Made Kit?
This is a genuine question worth addressing directly, because a lot of new beekeepers agonise over it. The honest answer is: it depends on what you value most.
A beekeeping box kit gives you pre-cut, often pre-drilled parts that slot together in an hour or two. If you’re not comfortable with power tools, or you want to focus your first season entirely on learning bee behaviour rather than woodworking, a kit is a perfectly sensible choice. Many kits bundle frames and foundation too, so you’re buying a complete, ready-to-use package.
Building from scratch gives you full control over timber quality, dimensions, and the construction method. It costs less, teaches you more about the equipment you’re using every time you open the hive, and produces a box you can repair from the ground up if something goes wrong. For beekeepers who enjoy working with wood, it’s also genuinely enjoyable — not just a means to an end.
The simplest way to decide: if the idea of a weekend afternoon cutting and assembling timber sounds appealing, build it. If it sounds like a chore you’d rather skip, buy a kit or a finished box and put your energy into the beekeeping itself. Both paths lead to the same destination — a hive your bees will happily call home.
Frequently Asked Questions
What wood is best for making a beekeeping box?
Cedar and pine are the two most popular choices, and both work well with different trade-offs. Western red cedar is naturally rot-resistant — well-maintained cedar hives routinely last 15–20 years outdoors with no chemical treatment needed. Pine is cheaper, easier to source, and perfectly functional, but needs regular painting or oiling to hold up against moisture and seasonal weathering. Whatever timber you choose, make absolutely sure it’s untreated. Pressure-treated or chemically preserved lumber is harmful to bees and has no place in a hive build.
How thick should the wood be for a beehive box?
The standard is 3/4 inch (19mm), and it’s a well-tested standard for good reason. That thickness provides adequate insulation, solid structural rigidity, and acceptable weight. A full Langstroth deep box loaded with honey, brood, and bees can weigh 60–80 lbs — going thicker adds meaningful weight to every lift. Going thinner reduces the insulation that keeps your colony comfortable through temperature extremes.
Do I need to treat the inside of the beekeeping box?
No — and this really matters. The interior of your beekeeping box must be left completely raw and untreated. Bees naturally coat every interior surface with propolis, which acts as their own sealant and has well-documented antimicrobial properties. Any paint, oil, stain, or chemical treatment you apply inside the box interferes with this process and can cause real harm to your colony. Leave it bare.
How long does it take to build a beekeeping box?
For a first-time builder working methodically, expect 4–6 hours of active working time for a single Langstroth deep hive body — measuring, cutting, assembling, and sanding. Add an hour or two across two days for two coats of paint to dry properly before use. By the time you build your second box, you’ll likely cut that time roughly in half as the process becomes familiar.
Can I use plywood to make a beekeeping box?
Technically yes, but it’s not a good idea for a permanent outdoor hive. Standard plywood delaminates under repeated exposure to rain and humidity — the layers separate and the box loses structural integrity relatively quickly. Most plywood also uses formaldehyde-based adhesives that off-gas over time, which you really don’t want near a colony. Plywood works fine for a temporary observation hive or a practice build, but for a working hive that’ll sit outside through seasons of weather, solid pine or cedar is the right call.
What is the difference between a brood box and a honey super?
Both are beekeeping boxes built to the same footprint — the only difference is their height. A Langstroth deep box (9-5/8 inches tall) is typically used as the brood box where the queen lays her eggs and the colony raises young bees. A medium super (6-5/8 inches tall) or shallow super (5-11/16 inches tall) sits on top and is where the bees store surplus honey for harvest. Both are built using exactly the same technique — the only thing that changes is the height of your front, back, and side panels.
How do I get bees into my finished box?
Once your box is built, fully painted, and aired outdoors for one to two weeks, you’re ready for your colony. The three main routes are purchasing a nucleus colony (nuc), buying a package of bees, or catching a swarm. Each has its own timing, cost, and process. There’s a thorough breakdown of how to get bees for beekeeping that covers all three options in practical detail — worth reading before you finalise your build timeline so the bees arrive when the hive is ready for them.
What to Build Next — and How to Think About It
Your first deep hive body is the foundation of everything that follows. Once it’s done, the natural sequence is: bottom board, crown board, roof — then a honey super once the colony is established, then a second brood box if needed, then a second complete hive. Each component uses exactly the skills you’ve just practised. The only things that change are the panel dimensions and, in the case of the roof, adding a slight pitch for rain runoff.
If you want to understand how all the components fit together as a complete hive system before you plan your next build, this overview of choosing the right beekeeping box maps out every piece and how they relate to one another — useful context for deciding what to tackle next.
Your first box always takes the longest. The second comes together in half the time. By the third, you’ll be cutting panels with quiet confidence, checking for square out of habit, and reaching for the clamps before the glue is even open. And through all of it, your bees will be living in something you built with your own hands — which, it turns out, is a genuinely good feeling.
Pingback: How to Start Beekeeping for Free - rwgreeff.com