Getting bees for beekeeping comes down to four main options: buying a package of bees, purchasing a nucleus colony, catching a wild swarm, or acquiring an established hive. Each approach works — the right one depends on your budget, your timeline, and how quickly you want your colony to reach full strength. Here is a complete breakdown of each path so you can choose with confidence.
Some of the links in this article may be affiliate links. If you make a purchase through these links, we may earn a small commission at no extra cost to you. Thank you.
- Four main sourcing options: packages, nucleus colonies (nucs), swarms, and established hives — each with different costs, availability, and build-up speeds.
- Package bees cost $150–$200 for a 3-pound box containing roughly 10,000 bees and a caged queen.
- Spring (March through May) is the optimal window for introducing new bees in most of North America — order as early as January to secure your spot.
- Equipment must be ready before the bees arrive — your assembled hive and protective gear need to be in place on day one, not day two.
Why Are So Many People Taking Up Beekeeping Right Now?
Beekeeping has seen a genuine surge in popularity over the past decade, and the reasons are easy to understand. People are drawn in by the chance to support struggling pollinator populations, produce their own raw honey, and learn a skill with deep roots in human history. If you are just beginning to explore the hobby, it is worth spending time understanding what beekeeping actually involves day to day before you commit to sourcing your first colony.
According to the American Beekeeping Federation, there are an estimated 115,000 to 125,000 beekeepers operating in the United States, with hobbyist beekeepers representing the overwhelming majority. Research from the Bee Informed Partnership — which conducts annual surveys on colony health and beekeeper management practices — consistently shows that newer beekeepers who start with a single, well-supported hive are far more likely to still be keeping bees three years later. That is an encouraging sign: the learning curve is real, but it is absolutely manageable.
The practical barrier to entry is lower than most beginners expect. You do not need a farm, a large garden, or years of agricultural experience. Successful beekeepers run hives in suburban backyards, on city rooftops, and in community garden plots. What you do need is the right bees, the right equipment, and a basic understanding of how a colony works. That is exactly what this guide covers.
What Are the Different Ways to Get Bees for Beekeeping?
There are four well-established routes for sourcing bees. Each one carries a different price point, availability profile, and set of practical requirements. Getting comfortable with standard beekeeping terminology before you start shopping will help you ask the right questions and avoid being caught off guard by jargon when you talk to suppliers or club members.
1. Bee Packages
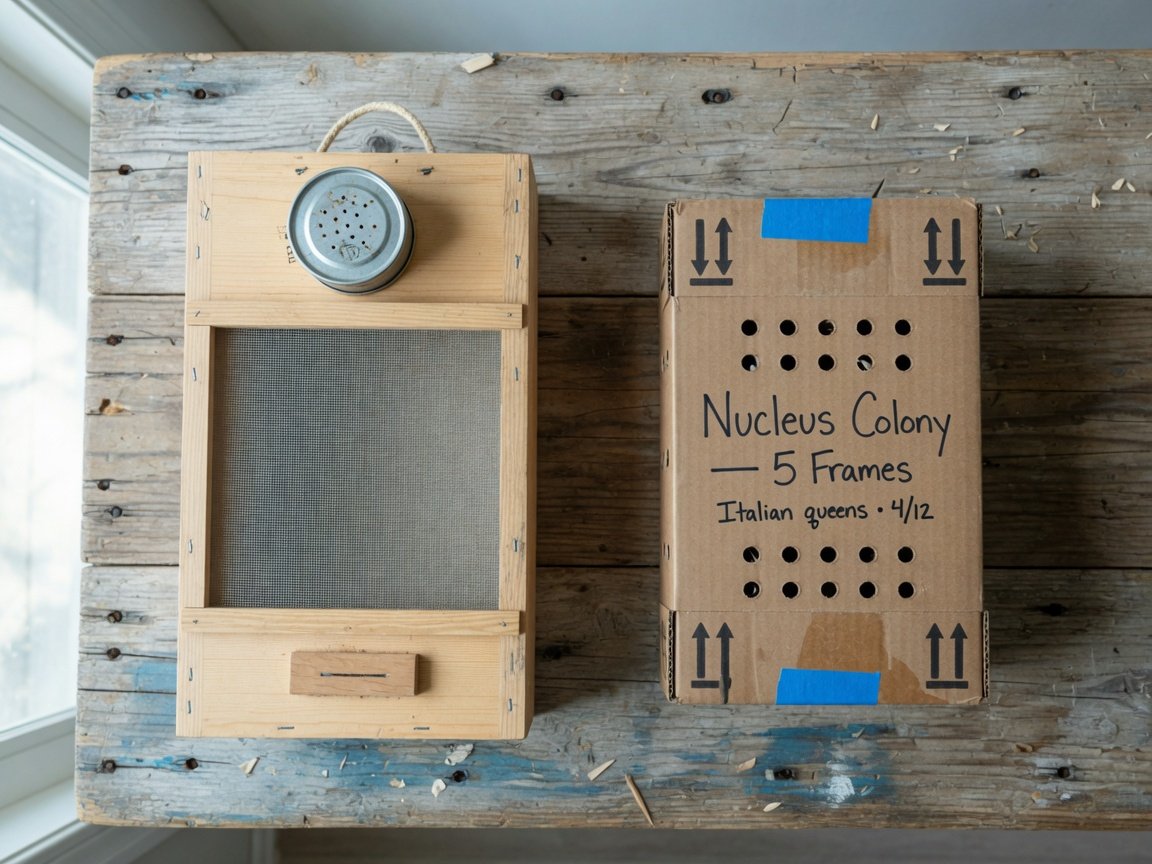
A package is a screened wooden or plastic box containing loose bees — typically 3 pounds, equivalent to roughly 10,000 worker bees — plus a caged queen. The bees and queen are not yet bonded, so installation involves a careful process to give them time to accept her. Packages are the most widely available option for beginners and are straightforward to ship, which makes them accessible even in areas without local suppliers.
2. Nucleus Colonies (Nucs)
A nuc is a small but fully functioning colony on drawn comb — typically five frames — housed in a temporary cardboard or wooden box. It includes a laying queen already accepted by her workers, developing brood at all life stages, and stored honey and pollen. Because the colony is already established and functioning, nucs build up significantly faster than packages. The tradeoff is that they are harder to ship and usually need to be sourced locally.
3. Catching a Swarm
A swarm is a cluster of bees — anywhere from 5,000 to 20,000 strong — that has left an established hive to find a new home. Catching swarms is free and, for many beekeepers, one of the most exhilarating experiences the hobby offers. It requires the right timing, a little nerve, and a connection to your local beekeeping network. Swarm season typically runs from April through June in most of North America.
4. Established Hives
Buying a full, working hive from another beekeeper gives you an instant, active colony. You get drawn comb, a laying queen, a full worker population, and often some stored honey — everything a new colony builds over months. This is the most expensive option and requires you to evaluate colony health before purchase, but it is an excellent shortcut when buying from a trusted mentor or local beekeeper who is reducing their operation.
How Do Bee Packages Work and Where Do You Buy Them?
Packages are the most popular starting point for new beekeepers because they are standardised, reliably available, and relatively affordable. A standard 3-pound package typically sells for between $150 and $200, depending on your region, the time of year you order, and whether you are buying from a local breeder or a long-distance supplier. In high-demand areas during peak spring season, prices can reach $220 or more.
You can source packages from several places:
- Local beekeeping suppliers and apiaries — always the safest choice, since bees from nearby are already adapted to your regional climate and conditions
- State beekeeping association breeder directories — most state associations maintain lists of vetted, certified breeders who have met basic standards for colony health
- Online suppliers in major bee-producing states — Georgia, California, and Texas are among the largest commercial bee-producing regions; reputable online suppliers ship packages overnight or by priority mail through the postal service
- Farm supply stores — some larger agricultural retailers accept seasonal package orders from January onward in areas with strong beekeeping communities
“Order your packages as early as January or February for spring delivery. Demand consistently outpaces supply at the most reputable breeders, and waiting until March often means getting placed on a waitlist or receiving a later delivery slot with less favourable weather conditions.”
— Common guidance from state apiary inspection programmes across the United States
Package bees are typically delivered in April and May, depending on your climate zone. The U.S. Postal Service is legally required to transport live bees, and most packages arrive in good condition — though some worker bee mortality during transit is normal. A dusting of dead bees on the bottom of the package screen is not a cause for alarm. A large cluster of dead bees or an unresponsive queen most certainly is.
What Is a Nucleus Colony and Is It Better Than a Package?
A nucleus colony — almost universally shortened to “nuc” (rhymes with “fluke”) — is essentially a head start on your first season. Because it arrives with drawn comb, an already-laying queen, developing brood at all stages, and workers fully bonded to their queen, a nuc hits the ground running from day one. Packages, by contrast, require the bees to draw all their comb from fresh foundation, which takes significant time and energy before the colony can focus on building population.
Nucs typically cost between $180 and $250, making them slightly pricier than packages. Many experienced beekeepers argue the faster establishment is worth every extra dollar. A nuc installed in April can potentially be strong enough to support a first honey super by late June or early July. A package colony installed at the same time may not reach that same population density until mid-to-late July under identical conditions.
The main limitation of nucs is availability. Frames of drawn comb make them difficult and expensive to ship, so you generally need a local or regional source. Your local beekeeping club is the single best resource for finding nuc sellers in your area — member breeders frequently sell nucs each spring, and because their local reputation is on the line, quality tends to be high.
According to regular reporting in Bee Culture magazine, first-year beekeepers who start with nucleus colonies tend to report stronger hives heading into their first winter compared to those who started with packages. That said, beekeeper management practices and regional conditions remain the single most important factors in whether any colony survives.
Can You Really Get Bees for Free by Catching a Swarm?
Yes — and for many beekeepers, catching a swarm becomes one of the most memorable experiences in the hobby. Swarming is how honeybee colonies reproduce at the colony level. When a hive gets overcrowded, the old queen and roughly half the workers leave together to find a new home. Before scouts locate a permanent cavity, this mass of bees clusters on a tree branch, fence post, garden furniture, or any convenient surface — sometimes for just a few hours, sometimes for a day or two.
Swarm season runs from approximately April through June in most of North America, though warmer regions can see swarms as early as March. A typical swarm cluster contains between 5,000 and 20,000 bees. They are remarkably calm during this period — they carry no honey stores to defend, and the majority of workers are gorged on food in preparation for the move. Swarm bees are about as gentle as bees ever get.
To catch a swarm, you will need:
- A clean, prepared hive box with frames set up in advance at your apiary
- Full protective gear — a veil and gloves at minimum
- A cardboard box, plastic bin, or wooden nuc box to collect the cluster
- A soft brush or your gloved hands to coax bees in the right direction
- A ladder if the cluster is positioned above easy reach
The process is straightforward: position your collection container beneath the cluster, give the branch or surface a firm shake to drop the bees in, then transfer them into your prepared hive. If you capture the queen — which usually happens naturally with a solid shake — the rest of the bees will follow her into the box within minutes. Most local beekeeping clubs maintain swarm-call lists that homeowners use when they find a cluster in their garden. Signing up for your local list is one of the best ways to get bees for free during peak season.
Is Buying an Established Hive a Good Option for Beginners?
Buying a full, working hive gives you everything at once: drawn comb, a functioning and accepted queen, a built-up worker population, and often some stored honey. Everything a new colony takes months to accumulate is there from the moment you take ownership. This is a legitimate and often underused sourcing option, particularly when you can find a reliable local seller.
If you are still exploring the full range of beekeeping methods available to you, it is worth knowing that buying an established hive is most suitable for beginners who have either completed a beekeeping course, found a mentor, or done enough reading to confidently evaluate a colony before handing over money. You need to recognise healthy brood, assess a queen’s laying pattern, and spot early signs of disease — all before you commit.
Typical prices vary considerably. A full-strength two-story Langstroth hive — complete with bees, frames, and all the woodware — might sell for anywhere from $300 to $600 or more, depending on the colony’s strength and the condition of the equipment.
Key things to check before you buy:
- Varroa mite levels — ask to see a recent mite wash result; anything over 2 to 3 mites per 100 bees warrants serious caution
- Brood pattern — look for solid, evenly capped brood with few empty cells in between, indicating a healthy and productive queen – **Signs of American foulbrood (AFB)** — this notifiable bacterial disease is devastating and highly contagious; learn to recognise the sunken, discoloured cappings and characteristic sour smell before you inspect any hive you intend to purchase – **Equipment condition** — old cracked woodware and excessively dark, brittle comb are red flags worth walking away from
When in doubt, ask if you can bring an experienced beekeeper with you to inspect the hive before buying. Most sellers in good faith will welcome that request without hesitation.
When Is the Best Time of Year to Get Your Bees?
Timing is one of the most important variables in whether your first colony thrives or struggles. Introduce bees too late in the season and they will not build adequate winter stores. Get the timing right and your colony has the entire spring and summer nectar flow ahead of it.
Spring (March–May): The Clear Sweet Spot
For most of North America, spring is the optimal window by a wide margin. Temperatures are rising, flowering plants are coming into bloom, and natural forage is increasingly abundant. A colony established in April has at least four months of productive foraging ahead before autumn sets in. This is when the vast majority of packages and nucs are sold and delivered, and when suppliers build their entire logistics calendar around.
Summer: Possible but Challenging
A package started in midsummer faces a compressed foraging window. Main nectar flows are winding down, and the colony may not accumulate sufficient honey reserves before cold weather arrives. A healthy colony in a colder climate needs the equivalent of approximately 60 pounds of honey to survive winter. If you start in summer, plan to feed heavily and consistently with 1:1 sugar syrup to compensate for the shortened season.
Fall and Winter: Not for New Colonies
Starting a brand-new colony from a package or nuc in autumn or winter is not recommended in most climates. Buying an established hive in autumn from a beekeeper who is reducing their operation is a different matter entirely — and can actually be excellent timing, since those colonies are already built up. But a fresh package installed in September rarely ends well north of the Sun Belt.
How Much Do Bees Cost in 2026?
Here is a straightforward cost breakdown for all four sourcing options. Regional pricing and supplier reputation will push these figures in either direction. These figures cover the bees only — not the hive equipment you also need before your bees arrive.
| Sourcing Method | Typical Cost (2026) | What You Get | Best For |
|---|---|---|---|
| 3-lb Bee Package | $150–$200 | ~10,000 bees + caged queen | Beginners, widest availability |
| Nucleus Colony (Nuc) | $180–$250 | 5 frames + laying queen + brood | Faster build-up, local sourcing |
| Swarm | Free | Variable population, unknown history | Experienced beginners, bonus colony |
| Established Hive | $300–$600+ | Full colony + equipment included | Skipping the build-up phase entirely |
The bees are only part of your first-year investment. Before your colony arrives, you also need a hive body, frames, protective gear, a smoker, and feeding supplies. Getting all the essential beekeeping supplies sorted before placing your bee order is genuinely important — a box of bees cannot wait on a kitchen counter while you scramble to assemble woodware. Most beginners spend between $400 and $800 total in their first year, covering bees and equipment combined.
How Do You Install a Package of Bees in Your Hive?
Installing bees for the first time is one of those milestone moments every beekeeper remembers vividly. It feels a little intimidating, but the process is methodical and calm once you have walked through it once. Here is a complete step-by-step walkthrough for the most common beginner scenario — a 3-pound package into a Langstroth hive. The whole process typically takes 30 to 60 minutes.
- Prepare your hive. Set it up in its permanent location before the bees arrive. Install all frames and light your smoker so it is producing cool, white smoke.
- Lightly mist the package screen with 1:1 sugar syrup. This calms the bees slightly and gives them energy after the stress of transit. A fine mist is enough — do not soak the screen.
- Remove the queen cage. It is suspended inside the package from a tab or strap. Handle it gently and confirm the queen is alive and moving before you do anything else.
- Remove the cork from the candy end of the queen cage. Workers will eat through the candy plug over 3 to 5 days, releasing the queen gradually. This slow-release process gives the colony time to bond with her before she is fully free.
- Position the queen cage between two central frames, candy end pointing upward. Bees on both sides of the cage will be able to access and tend to the queen through the screen.
- Remove the feed can from the package opening and immediately shake the bees firmly and directly into the open hive body over the frames. Most bees will drop straight down onto the comb.
- Brush any remaining bees from the package walls into the hive using a soft bee brush or a gentle lateral shake. Leave the empty package near the hive entrance — remaining stragglers will walk in on their own.
- Gently replace the remaining frames, being careful not to crush bees. Close up the hive and add your feeder filled with fresh 1:1 sugar syrup.
- Check for queen release after 5 to 7 days. If the candy is consumed and the cage is empty, she is free and among her workers. If the candy is still present, carefully release her by hand and remove the cage.
- Complete your first full inspection 7 to 10 days after installation. Look for eggs and young larvae — the clearest confirmation that the queen is healthy, accepted, and actively laying.
A healthy, well-mated queen can lay between 1,500 and 2,000 eggs per day at the height of the season. Spotting that tight, consistent pattern of eggs during your first inspection is one of the most satisfying sights in beekeeping.
What Equipment Do You Need Before Your Bees Arrive?
This is the section beginners most commonly skip — and most regret skipping. Your equipment must be fully assembled and in position before your bees show up, not after. A box of bees cannot sit on a doorstep for two hours while you make a hardware run.
- A hive body — the Langstroth 10-frame or 8-frame is the standard beginner choice in North America
- Frames with foundation — 8 to 10 frames for your brood box, assembled and ready to go
- A bottom board, inner cover, and outer (telescoping) cover
- A hive stand to keep the box off the ground, improve air circulation, and reduce moisture
- A full bee suit or at minimum a veil — protective gear is non-negotiable, especially in the first season
- Gloves — goatskin offers better sting protection; nitrile gives better dexterity
- A smoker and fuel (dry burlap, pine needles, wood pellets, and commercial smoker fuel all work well)
- A hive tool for prying apart propolis-sealed frames
- A feeder — an entrance feeder, top feeder, or frame feeder, depending on your setup
- Sugar and water for your 1:1 syrup, mixed by weight
Picking up one of the best beginner beekeeping books several weeks before your bees arrive is equally worth your time. Reading ahead gives you context and confidence that hands-on experience alone cannot front-load. You will make significantly better decisions during your first inspections if the fundamentals are already clear in your head before the bees are in your hands.
If you are still weighing whether all this effort is genuinely worth it, exploring why beekeeping matters — for pollinators, for local ecosystems, and for your own wellbeing — tends to settle the question quickly for most people. Most beekeepers who stick with it past the first year say they cannot imagine life without their hives.
Frequently Asked Questions About Getting Bees for Beekeeping
How many bees do I need to start beekeeping?
A standard 3-pound package contains roughly 10,000 worker bees — that is all you need to get started. Colonies grow quickly from there, typically reaching 40,000 to 60,000 bees by midsummer if foraging conditions are good and the queen is laying well.
Can I get bees for free?
Yes. Catching a swarm is the primary way beekeepers acquire bees at no cost. Contact your local beekeeping association and ask to be added to the swarm-call list. Many homeowners are actively grateful for help removing a swarm cluster from their property and will call you rather than an exterminator.
What is the best time of year to get bees?
Spring — specifically March through May in most of North America — is optimal. Nectar flow is beginning, temperatures are stable enough for colony establishment, and bees have the maximum amount of warm weather ahead to build up food stores before autumn. Place your order in January or February to avoid missing availability at the best suppliers.
What is the difference between a package and a nucleus colony?
A package is a box of loose bees with a caged queen who is not yet bonded to the workers. A nucleus colony (nuc) is a small but fully functioning hive on drawn comb with a laying queen already accepted by her colony. Nucs establish faster and require less supplemental feeding in the early weeks. Packages are more widely available and typically cost slightly less.
Do I need to buy a queen separately?
No. Packages include a caged queen, and nucs include a laying queen already bonded to the colony. You only need to source a replacement queen separately if your colony later becomes queenless — which can happen, but is not the norm for a healthy, well-managed first hive.
How do I find a local beekeeper to buy bees from?
Your state or regional beekeeping association is the best starting point — most maintain directories of certified breeders. Local beekeeping clubs are equally valuable. Fellow members frequently sell nucs each spring and can tell you exactly which suppliers are honest, reliable, and transparent about colony health in your specific area.
What happens if my bee package arrives with a dead queen?
Contact your supplier the same day. Reputable suppliers will typically replace a dead queen or issue a partial refund, particularly when you notify them promptly. Always inspect the queen cage as soon as the package is in your hands — acting quickly gives you the best chance of a remedy before the colony deteriorates.
Your Action Plan: What to Do Next
Getting bees for beekeeping is one of the most exciting steps you will take as a new beekeeper. The path is genuinely straightforward once you know it: choose your source, order early, get your equipment ready, install with calm and patience, and follow up with consistent inspections. Thousands of hobbyists do exactly this every spring, and there is no reason you cannot be one of them.
- This week: Join your local or state beekeeping association. Attend a meeting. Introduce yourself and ask about local breeders, available nucs, and the swarm-call list.
- January–February: Place your package or nuc order with a reputable supplier. Early orders get the best queens and the most convenient spring delivery slots.
- February–March: Assemble and paint your hive body. Set it in its permanent location — a spot with morning sun, afternoon shade, easy access for you, and minimal foot traffic for everyone else.
- April–May: Receive and install your bees. Feed consistently with 1:1 sugar syrup for the first several weeks to support comb building and early colony growth.
- One week after installation: Check for queen release. Confirm she is out of her cage and moving freely among the frames.
- 7–10 days after installation: Complete your first full inspection. Look for eggs — the clearest sign of a laying queen and a colony heading in the right direction.
Beekeeping rewards patience, preparation, and genuine curiosity. The beekeepers who still love it a decade in are almost always the ones who took those early foundational steps seriously. Get your gear sorted, find a local mentor, and enjoy every moment of it.
— “`json