Harvesting honeycomb is one of beekeeping’s most rewarding moments — and it’s simpler than most beginners expect. Set up your frames correctly, handle them gently, and package the comb cleanly, and you can go from open hive to table-ready comb honey in a single afternoon.
Some of the links in this article may be affiliate links. If you make a purchase through these links, we may earn a small commission at no extra cost to you. Thank you.
Quick takeaways:
- Comb honey skips extraction entirely — beeswax, pollen, propolis, and honey come out together, exactly as the bees made them.
- Frame preparation — starter strips, 3/8-inch bee space, level hives — determines most of your harvest quality before you lift the lid.
- Wait until at least 80% of cells are capped before pulling any frames. Ripeness matters more than timing.
- Freeze freshly cut comb in airtight containers to lock in freshness and stop fermentation if you can’t package immediately.
- First-year colonies rarely produce surplus comb honey — treat year one as a learning season and plan your first real harvest for year two or three.
Why Harvest Comb Honey Instead of Extracted Honey?
Comb honey gives you the whole hive product — beeswax, pollen, propolis, and honey together in one package that requires zero processing. There’s no spinning in an extractor, no straining, no heating. You cut it, pack it, and you’re done. For small-scale beekeepers, that simplicity is genuinely appealing.
That simplicity also has real commercial value. Beekeeping industry sources consistently report comb honey commanding a significant premium over extracted liquid honey — often two to three times the price per ounce at farmers’ markets and specialty food retailers. Customers recognise it as an authentic, minimally processed product. Think of it like buying a handcrafted item instead of its factory equivalent: the craftsmanship is visible in every wax cell.
Less equipment is another advantage worth considering. You don’t need an extractor to produce comb honey, and a quality stainless steel extractor can run $300–$800 or more for a hobby-grade model. A sharp knife, a wire drip rack, and some clear clamshells are genuinely all the gear you need to get started. For a first- or second-year beekeeper still figuring out whether the hobby will stick, that’s a meaningful difference in upfront cost.
And then there’s flavour. Comb honey retains trace aromatic compounds from beeswax and propolis that extracted honey loses during the spinning and straining process. Research into honey composition has shown that beeswax is chemically complex, containing hundreds of minor aromatic compounds — and some of those transfer into the honey while it sits capped in the comb. Whether you notice the difference at the table is personal, but biochemically, comb honey is about as close to “straight from the hive” as any food gets.
What Are the Best Uses for Comb Honey in the Kitchen?
Comb honey is more versatile than most first-time buyers expect when they see it sitting on a market table. Here are the uses that work best and why they work so well:
| Use | What It Does |
|---|---|
| Salad topping | Adds floral sweetness and wax texture contrast alongside greens and vinaigrette |
| Cheese and charcuterie board centrepiece | Visual anchor with genuine flavour complexity — pairs with sharp and soft cheeses alike |
| Brie or camembert pairing | Honey melts softly into warm cheese while the wax holds its shape — elegant and simple |
| Ice cream and dessert topping | Honeycomb chunks add crunch, sweetness, and visual drama to simple desserts |
| Breakfast and brunch displays | Elevates the whole spread; guests consistently stop and ask about it |
The classic move is placing a piece of comb on top of gently warmed brie or camembert. The honey softens and runs into the cheese while the wax retains its structure — it looks polished and the flavour pairing is excellent. High-end restaurants and boutique hotels have used this presentation for years on their cheese boards because it genuinely works, and it scales down perfectly to a home kitchen or market stall.
For anyone selling at markets, comb honey in clear clamshells sells itself. The wax cells catch the light in a way that a jar of liquid honey simply cannot match. Customers stop, they look, they ask questions — and those questions are most of the sale. You’re not just selling honey; you’re selling an experience and a story.
How Do You Set Up a Hive for Comb Honey Harvests?
Getting the hive ready is where most of your harvest quality is decided — before you’ve lifted a single frame. Think of it like setting a stage: the bees do the performing, but you arrange the conditions so they can do their best work.
- Remove the foundation from your target frames. Bees build natural free-form comb when there’s no plastic or wax foundation guiding them. This produces the irregular, visually striking cells that make comb honey distinctive — and more commercially appealing than the perfectly uniform cells built against foundation.
- Hang a starter strip from the top bar. A thin strip of wax, plastic, or wood gives the bees an anchor point to begin building from. Drizzle a small amount of melted beeswax over the strip surface to encourage initial attachment — bees follow wax scent and build downward from the starting edge.
- Check and confirm hive level. This sounds overly precise, but it matters more than most new beekeepers expect. Bees use gravity as their guide when building comb. A hive tilted even a few degrees produces comb that leans toward one side of the frame, drips along the timber, and eventually collapses under its own weight when full of honey. A bubble level and two wooden shims fix this in under two minutes.
- Set frame spacing at or below 3/8 inch. The concept of “bee space” — the approximately 3/8-inch (9.5 mm) gap bees prefer to move through without filling with burr comb or propolis — was formalised by the Reverend Lorenzo Langstroth in 1851 and remains the foundation of modern hive design. Most commercial frames with plastic spacers are set close to this measurement, but it’s worth verifying in older or modified equipment.
- Use minimal smoke throughout setup. Light smoke keeps the colony calm and manageable. Heavy smoking before a comb harvest stresses the colony unnecessarily and, at high concentrations, can leave residual aromatic compounds in the beeswax. Less smoke genuinely produces better comb honey.
Most experienced beekeepers place foundationless comb frames in a honey super positioned above a queen excluder. The excluder prevents the queen from laying eggs in the upper box, keeping your harvest completely free of brood. Worker bees move freely through the excluder to fill and cap the comb above — exactly the separation you want.
When and How Do You Pull Comb Frames From the Hive?
Timing the pull is as important as the physical technique. Your target is frames where at least 80% of cells are capped with beeswax. That wax cap signals that the bees have reduced the honey’s moisture content to approximately 17–18% — the threshold below which honey won’t ferment. Pull frames with too many open, uncapped cells and you risk producing comb that sours in the container, which is a dispiriting outcome after careful setup work.
Industry guidance from beekeeping associations and extension services consistently cites the 80% capping benchmark as the practical minimum for harvest readiness. Some experienced producers wait for 90–95% capping to ensure maximum ripeness and the longest possible shelf life — especially for comb honey destined for retail sale rather than immediate home use.
Here’s how to remove bees from frames with minimal disruption:
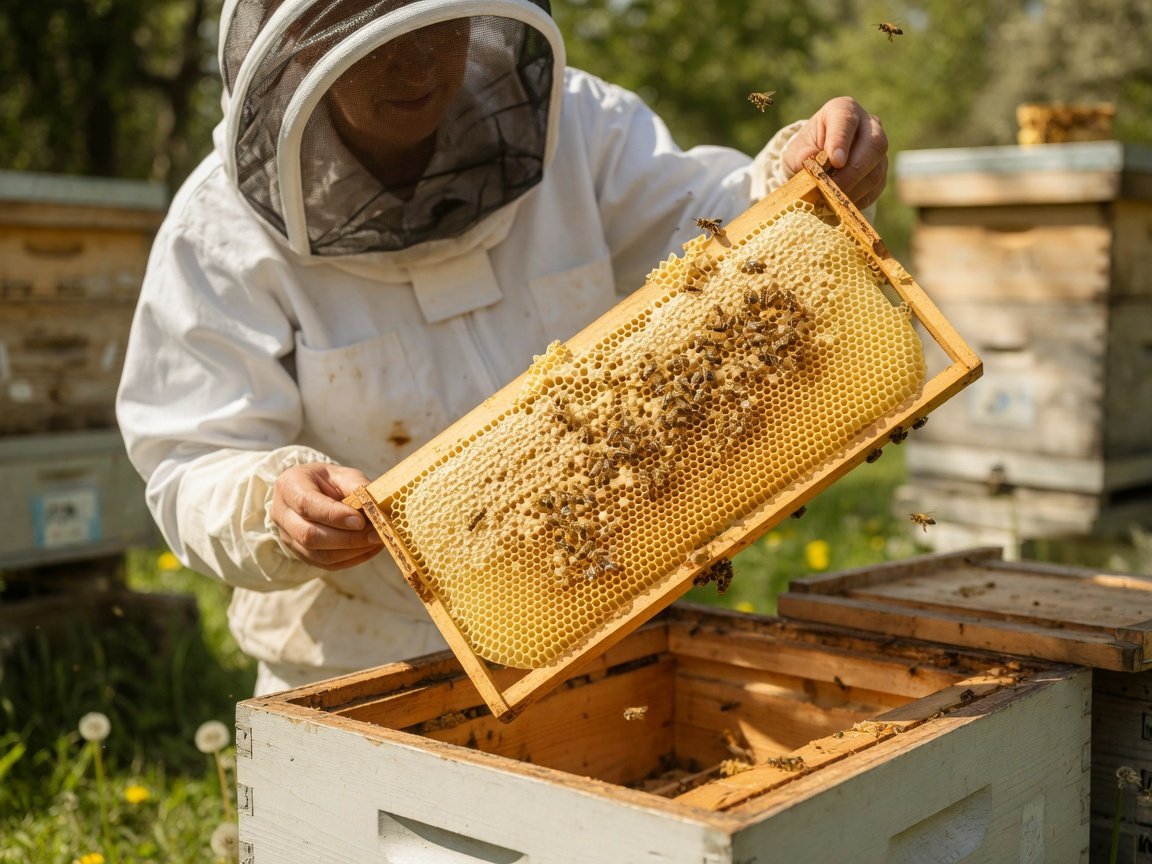
- Lift frames slowly and at a gentle angle. Quick movements vibrate the comb, alarm the colony, and risk cracking or collapsing comb heavy with honey — especially problematic on large-cell free-form comb.
- Use a soft bee brush or a clean feather to sweep bees back toward the hive entrance. This is consistently gentler than smoke at this stage and causes far less defensive response from the colony.
- Avoid using smoke directly on the comb. Beeswax absorbs aromatic compounds readily. Smoke odours applied directly during harvest can linger in the wax and transfer subtly into the honey’s flavour profile.
- Consider staggered harvests rather than pulling a whole super at once. Pulling one or two frames at a time over several weeks is less stressful for the colony and typically produces better-quality comb because each frame is harvested at peak ripeness rather than at an averaged level of readiness across the whole super.
If you can’t process frames immediately, place them in the freezer inside sealed bags or airtight containers. Freezing halts any small hive beetle larvae or wax moth eggs from developing in the comb — a genuine pest risk in unprotected pulled frames — and locks freshness in until you’re ready to cut. Frames can be frozen for several months without any detectable change in quality.
How Do You Cut, Package, and Prevent Honey Pools in Comb Honey?
Cutting comb honey is genuinely satisfying — it looks and feels a bit like slicing a very fragrant, very delicate cake. The key is working methodically and giving the honey adequate time to drip before you seal the containers.
- Set up a wire rack over a drip tray. Work over this setup so any dripping honey falls through the rack onto the tray below, keeping the cut comb surface clean. This also makes cleanup significantly easier and lets you recover dripped honey for your own use.
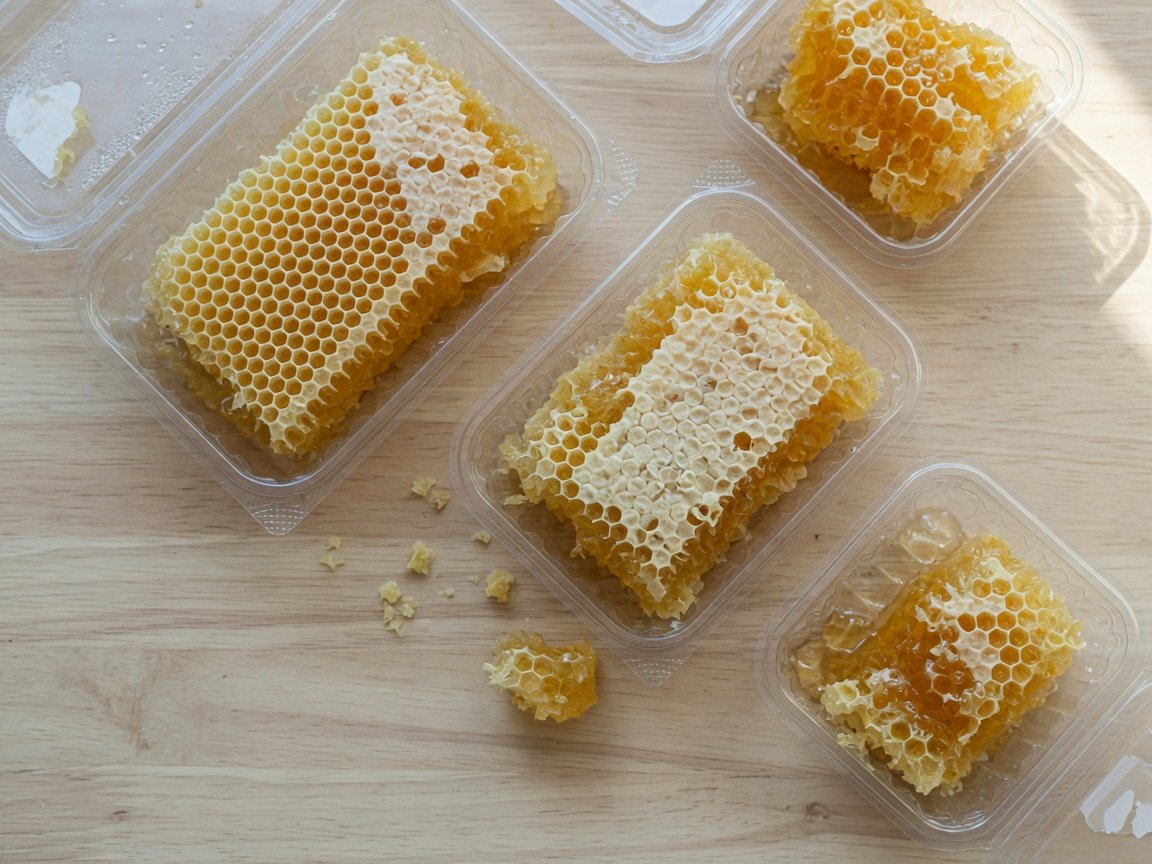
- Cut sections to fit your containers. Standard clear clamshells in 4 oz (113 g) or 8 oz (227 g) sizes are the most common retail format. Measure the internal container dimensions once and cut consistently to that size. A sharp, thin-bladed knife — a long bread knife or a purpose-made comb cutter — gives the cleanest edges without tearing through wax cells.
- Allow drips to fall away before packing. Give each cut piece two to five minutes resting face-down on the wire rack. Honey pooling in the bottom of a clamshell looks untidy at market, crystallises unevenly over time, and makes the container feel sticky when customers pick it up. This waiting step costs nothing and meaningfully improves presentation.
- Dab and tidy edges if needed. If a cut edge is still weeping after drip time, a light touch with a clean cloth tidies it before packing. Some producers run a thin layer of food-grade film along exposed cut edges to slow further dripping during display and storage — optional at hobby scale, useful at market scale.
- Display in clear containers. The whole commercial case for comb honey rests on its visual appeal. Opaque packaging defeats the purpose entirely. Clear clamshells or glass-lidded boxes let the product do the selling for you.
Label every container with the harvest date, your producer name or brand, and net weight. In most markets, basic honey labelling requirements cover weight, producer identification, and date — but check your local food labelling regulations before selling, as requirements differ by country and jurisdiction.
How Should You Store Comb Honey to Maximise Shelf Life?
Properly harvested comb honey — moisture content at or below 18% — is shelf-stable indefinitely at room temperature. Refrigeration isn’t necessary for cured comb honey, and in fact refrigerating can actually accelerate crystallisation, changing the wax texture and affecting visual quality for retail purposes.
How to tell if your honey is properly cured: The wax caps should look dry and slightly matte rather than wet or shiny. Caps that appear concave — pushed inward — or cell walls that feel soft under gentle finger pressure may indicate moisture content above safe storage levels. A honey refractometer (around $20–$40 for a basic model) gives you a precise moisture reading in seconds and removes the guesswork entirely.
For batches you won’t process or sell immediately, freezing is the most reliable storage method:
- Let cut sections drip overnight on a wire rack before freezing so you’re not sealing a pool of liquid honey in the container.
- Pack into airtight, food-grade containers — zip-lock freezer bags, hard-sided clamshells, or glass jars with secure lids all work well.
- Label every package with harvest date and, if you know it, the primary nectar source. Single-origin florals — clover, heather, orange blossom — command additional price premiums at specialty markets.
- Organise the freezer chronologically so you thaw oldest stock first and rotate consistently through your inventory.
- Thaw at room temperature for two to four hours before serving or selling. Do not microwave frozen comb honey — heat damages the wax cell structure and dulls the aromatic compounds that make comb honey distinctive.
Freezing effectively pauses shelf life without affecting quality. Frames pulled in late summer can come out of the freezer in December for winter markets and look — and taste — as fresh as harvest day. That flexibility is one of the genuinely underrated advantages of comb honey over extracted liquid honey, which can crystallise, separate, or develop off-flavours over months at room temperature.
What Should Beginner Beekeepers Know Before Their First Comb Honey Harvest?
Starting with comb honey as a beginner is entirely achievable — but going in with realistic expectations and a modest initial setup serves you far better than converting a whole honey super to foundationless frames in your first season.
Here’s what experienced beekeepers consistently advise for first-timers:
- Start with two or three foundationless frames, not a full super. Test how your specific colony takes to building free comb before committing more equipment. Some colonies adapt quickly; others are slower or more reluctant. One season of careful observation with a small trial is worth more than reading ten guides — including this one.
- Prepare your workspace before you open the hive. Have your rack, tray, knife, containers, and labels ready before you lift the first frame. Moving back and forth between hive and kitchen with sticky comb frames is stressful, messy, and hard on the bees — who become increasingly defensive as the inspection runs long.
- Watch for 80% capping at every inspection. Make estimating capping percentage a habit every time you look at a frame, even on inspections when you’re not planning to harvest. After four or five inspections, you’ll read frames quickly and accurately by eye without consciously calculating.
- Wear full protective gear every single time. Suit, veil, and gloves — without exception as a beginner. Experienced beekeepers sometimes work without gloves after years of building technique and calm. Beginners are slower and less predictable in their movements, which increases the probability of stings. A sting while holding a heavy comb frame causes exactly the kind of flinch that breaks comb and escalates the situation.
- Keep your processing area completely odour-free. Beeswax is highly absorbent of aromatic compounds. Work in a clean, well-ventilated space free of cleaning products, cooking smells, and perfumes — all of which can transfer into the wax during cutting and packaging.
One final honest note: your first year may produce little to no harvestable comb honey, and that’s completely normal. First-year colonies spend the majority of their energy establishing population, drawing comb for brood rearing, and building winter stores. Beekeeping extension services across multiple countries consistently advise that first-year harvests should not be expected, and removing too much from a new colony can compromise its winter survival. Plan your first real comb honey harvest for year two or three, and treat year one as exactly what it is — a learning season.
Frequently Asked Questions About Harvesting Honeycomb
What is the 3-3-3 rule for bees?
There’s no formally established “3-3-3 rule” in mainstream beekeeping. The phrase turns up in online communities but doesn’t correspond to any recognised standard or protocol. What experienced beekeepers actually track are practical, observable factors: brood development timing, pollen and nectar source availability, hive levelling, frame spacing, bee space maintenance, and seasonal colony strength. Focus on those concrete factors and you’ll be ahead of most informal rules you encounter online.
What is the 7-10 rule in beekeeping?
Like the 3-3-3 rule, the “7-10 rule” isn’t a universally recognised beekeeping standard. It appears in some online communities with varying definitions — sometimes relating to queen-rearing cycles, sometimes to inspection intervals — but with no consistent meaning across sources. If you’ve seen it referenced in a specific context, bring that context to your local beekeeping association. They’ll give you practical, regionally appropriate guidance that informal online rules rarely provide.
How do you harvest honey for beginners?
For comb honey, start with two or three foundationless frames in a honey super fitted with starter strips. Once at least 80% of the cells are capped with bee swax, lift frames slowly, brush bees off gently with a soft brush, and bring the frames to a clean work surface. Cut sections to fit your containers, let excess honey drip for two to five minutes on a wire rack, then pack into clear clamshells and label with the harvest date and your producer name. No extractor needed, no heated equipment, no specialist gear required at beginner scale.
How long does comb honey last?
Properly harvested comb honey — moisture content at or below 18% — lasts indefinitely at room temperature in a cool, dark spot. It may crystallise over months, particularly in cooler rooms, but crystallised comb honey is completely safe and still delicious. For longer-term storage or to preserve visual quality for market sales, freeze in airtight containers and thaw at room temperature for two to four hours before use.
What do you do with the frame after extracting comb honey?
After cutting the comb out, inspect the empty frame. If the remaining wax is clean and the frame is structurally sound, return it to the hive — bees will rebuild from any wax starter still attached and refill it next season. If the wax is dark, heavily used, or contaminated with old pollen or brood, melt it down for beeswax reuse in candles, wood polish, or cosmetics. Clean empty frames with hot water, dry fully in direct sunlight, and they’re ready for next season.
Can you eat the wax in comb honey?
Yes — completely. The wax in comb honey is food-grade beeswax and is safe to eat. Most people chew it briefly like soft gum and spit it out once the honey is gone. Swallowing it is harmless; beeswax passes through the digestive system without being absorbed or broken down. Some people enjoy chewing the wax; others pick around it. Either approach is fine, and it’s worth telling customers this if you’re selling — many first-time buyers genuinely aren’t sure.
When is the best time of year to harvest comb honey?
Late summer — typically July through September in the Northern Hemisphere — is the peak window for most beekeepers. Nectar flows are at their highest during this period, colonies are at maximum foraging strength, and comb frames fill and cap fastest. A late summer harvest also leaves the colony enough time to build adequate winter stores before cold weather sets in. In warmer climates with year-round nectar flows, harvests are possible across a longer calendar window, but late summer remains the most reliable and productive period for the majority of beekeepers.
—